Showing posts with label hydroponics/aquaponics. Show all posts

Wednesday, August 3, 2011

Rosemary cuttings for Granny.

Kelli's Granny wanted some rosemary plants a few weeks ago.  We told her not to buy any because I have bushes of rosemary and discovered recently that if I cut a branch and put it in water, it very easily grows roots.

About 3 weeks ago I cut these branches.  They were about 7 inches long.  I cleaned off about 2 inches at the bottom, removing any pines or little branches and put them in about a half inch if water. 

This is how the roots look today.  I've planted them in little pots with a mixture of some potting bark and vermicast from my worm bin. 

I hope these bushes grow big and Granny makes a nice rosemary roast pork for dinner!  :) 

Sent via mobile.
http://RickNakama.com

Monday, August 3, 2009

Harvesting Our Compost & Re-Bedding Our Worms...


www.RickNakama.com worm compost binIt's only been 3 months since we started our worm compost bin. Click for the 1st post<. The guidelines suggest re-bedding your worm bin after 6 months. We couldn't wait! Hahaha. It seemed that they were rapidly consuming the food we fed them and creating a lot of vermicast so we decided to "harvest". This photo collage to the left is in chronological order. The top is what the top layer of the bin looked like when we decided to harvest. We removed the newspaper layer to get to the decomposing food and worms. There are thousands of other insects and things that also live amonst the worms and help break down the food. (Btw, their "food" is our vegetable waste and coffee grinds.)

We made a pile for the large chunks of paper & food, a pile for medium chunks & a pile for finer vermicastings. After that, we sorted through to get as many of the chunks of things out to be re-bedded. At the same time, we are also separating our worms. This is so we can see how much our worm population has increased and so that we can put as many of the worms as possible back into the new bedding.
www.RickNakama.com worm compost binThis is what our worm ball looked like when we started 3 months ago. It was a quarter pound of worms at that time.
www.RickNakama.com worm compost binThis is our worm ball when we harvested & re-bedded couple weekends ago. We weighed them and they weighed a little over half a pound. This is great because they are estimated to multiply at an average rate of twice it's weight every 6 months under ideal conditions. This means our conditions must be a little better than ideal because they have more than doubled their weight and population in only 3 months! Whooo hooo! This is good news to me because a quarter pound of worms to start with cost $40! I'm glad my worms have more than doubled it's value. Too bad my money in the bank doesn't do that. :P

We have set aside our vermicastings in a different containter that I'm keeping watered. I'm trying to let any baby worms and sneaky worms that are hiding in it consume what ever food is left in it. I'll try to separate as many worms out of there in a few weeks and then be left with the compost to add to the plant soil.

We love doing this... I'm thinking of starting multiple worm bins at different stages so we can harvest and play with our worm friends more often. I know some of you must think it's gross. There is no smell and the worms are cool... literally. They have a therapeutic affect on you. It is relaxing to have the vermicast (worm doots) flowing through your fingers and squigly worms dancing around in your palm. It also reduces your waste and provides you with nourishing compost and "compost tea" for the plants around your house!

Bookmark and Share


Orchid & Bonsai Show at Kalani High School


www.RickNakama.com Kalani High School Orchid & Bonsai ShowA couple weekends ago we stopped by at the Orchid and Bonsai Show at Kalani High School. It's been years since I've stepped into the Kalani High School cafeteria (that's my alma mater). I received some complimentary entry cards which are more like reminder cards. The orchid organizations that organize the show just ask for a donation at the door.

There were many beautiful orchids to look at and/or purchase. I was amazed at how they are able to get them all to bloom for the show. There must be some secret trick to that. There were some really interesting ones that had scents. Even some that smelled like chocolate! I tried to find a vanilla orchid there, but nobody had any. There were some super small orchids. The flower actually looked like a "normal" orchid, but it was soooo small. Like a half a centimeter in size or so. That was amazing!

Another feature at this show was the miniature Japanese town. Take a look at the photo. Almost looks like I took a picture of a real Japanese house in the country. It's really neat. Someone should bring their train set and set it up to run along the Japanese town at the next show! :)


Bookmark and Share


Saturday, April 25, 2009

Compost Worm Bin


Last weekend, we decided to begin a compost worm bin. Kelli and I have been interested in these composting worms for a while, but just never made the effort to start one. A lot of the procrastination had to do with the start up costs.
www.RickNakama.com Waikiki Worm Company storeThere is a local business woman who has been specializing in providing these compost worms and worm bin kits for several years. Her business is called Waikiki Worm Company. The business recently expanded and is now in a larger retail space just outside of Waikiki, at 1917 S. King Street.
We started with the basic set up. It comes with:
www.RickNakama.com compost worm bin-A 1/4 pound of EPIGEIC Perionyx excavatus, a.k.a. Hawaii's native composting worms. (Click for worm info.) Sold ala carte at Waikiki Worm Company for $40 + tax. It comes in a quart size zip lock bag with some vermicompost that contains the other organisms to help start the composting process.
-A 10 gallon plastic bin with "Waikiki Worm Company" logo and pre-fabricated holes. Of course you could buy this bin from Walmart or somewhere for about $5-$10, but it won't have the official logo on it and you'll need to drill your own holes.
-A basic worm bin starter book titled "Worms Eat My Garbage" by Mary Appelhof. I've read about half of it, not in order. There are interesting parts, but has a lot about designing your own worm bin. I wasn't very interested in that part because I don't really want design information. I enjoyed the parts of the book that gave more explanation on the care of the worms.
-Start up instruction leaflet & couple worm-y bumper stickers.
The total with tax came out to $71.20. The other things we purchased to complete our set up was a larger plastic container to fit under the bin to be used as a drip tray and a couple bricks to prop the bin over the drip tray for adequate ventilation. That was another $10 or so.
www.RickNakama.com Waikiki Worm Company wormswww.RickNakama.com Waikiki Worm Company worms
www.RickNakama.com Waikiki Worm Company wormsWe started with the 1/4 pound because it's suggested that they will be able to keep up with 2 adults average weekly food waste that can be added to the bin. The suggested consumption amount is 2 pounds of fruit, vegetable or grain waste per week.
It takes a while for the entire process to look like vermicompost. In approximately 4-6 months we should have our first batch of nutritious compost for our plants. Right now it just looks like a bunch of worms eating fruit and vegetable waste. I'll post another update when they start to break down more of it.

Video...
From WormBin

Tuesday, January 6, 2009

A Weekend, The Westin and a Wedding in Maui... Updated 1/6


www.RickNakama.com View of Molokai from room

Here's a quick (really quick) walk-through video of our suite. Blair Witch style cinemography at it's finest.

We are here for a wedding. The video screen below is my qik.com live video stream link. I'll stream some live video from my mobile phone so you can have up to the minute footage almost like you are here! Live time 1/4/09 5pm HST and on through the evening here and there.

On our last day in Maui, I decided to take Kelli on a ride back to the Kahului Airport by going around the "head side" of the island. The "head side" is what I call going around from Kapalua to Kahakaloa because if you look at the shape of the island of Maui, it looks like a head with the upper body. The first video is a short clip about 33 seconds. The one below is if you are really interested it's about 5 minutes long. Be sure to take your motion sickness medicine before watching.


Tuesday, November 27, 2007

Bonsai Master Walter Liew's Borders Book Signing...


www.RickNakama.com Bonsai Master Walter Liew Living Art of BonsaiThis past Saturday I went to pick up another autographed copy of Bonsai Master & Author Walter Liew's The Living Art of Bonsai book. It's a great book because it's filled with lots of color pictures and bonsai diagrams for reference. The amazing sale price of 20% off at Borders meant I was able to pick it up for about $13! I had this one autographed for a friend's Christmas present.
Related Links: Master Walter Liew Googled, Google Maps of Dragon Garden, Yellowpages Dragon Garden Listing, Full Size Photo Album, My Bonsai Posts, Borders, The book on Amazon.com.

Thursday, November 15, 2007

Hydroponic Salad Mix Seedlings...


www.RickNakama.com hydroponics
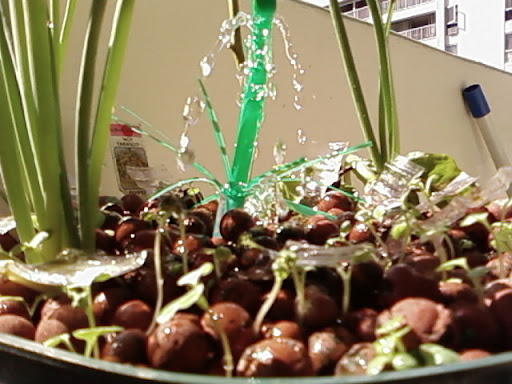
www.RickNakama.com hydroponicsIt's been about a week since I revamped my condominium vegetable garden. This is a picture from today. I added on a homemade water diffuser sponsored partially by Starbucks Coffee's recognizable green straw the labor and engineering was provided by me. The mixed greens and other seedlings seem to be sprouting very well. Most are about 2 inches in length or more. A few have began showing their 1st true leaf sprouts.
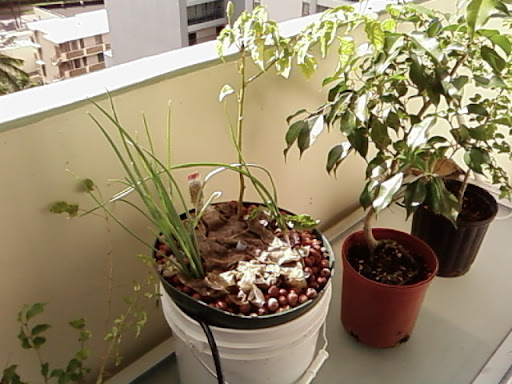
This water sprinkling design I made is not the most effecient for several reasons. 1st of all it allows the water to evaporate faster and there is more splashing, another reason is that it wets the above ground part of the plant and if you have a plant that prefers to only have moist roots (like some flowers) this will not be good. I set this system up like this because it just looks neat when the water is pumping. It's the "Garden Water Feature" of my condo.

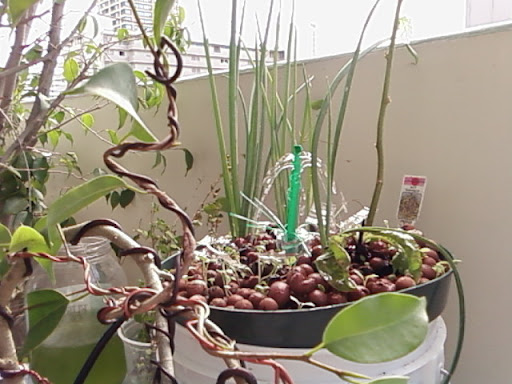
PS- In the larger picture above, you can see a part of Kelli's 2nd bonsai tree in the foreground. The original look of that ficus tree is in my previous hyrdoponics post from last week. We're loving the "Art of Bonsai" classes!

Thursday, November 8, 2007

Hydroponics Simplified...


www.RickNakama.com hydroponics
About a year or so ago, I became interested in hydroponics. I've always enjoyed growing my fresh herbs and vegetables since I was a child. Living in a condo, working with soil is a major issue. I decided to try hydroponics. Actually, I decided to go with a more complex aquaponics set-up at first.
www.RickNakama.com hydroponicsHere is what my aquaponics looked like when I started it. I won't show a picture of how it ended... trust me it was not good. The problem I think was that my small guppies and the 1 big cichlid in the tank were not producing enough nutrients for the types of plants I tried to grow (eggplant, cucumber, green onions, chili peppers, bell peppers & lettuce). You can probably tell how well that went by what plants are left in my new set-up (chili pepper, green onions, 1 lettuce, 1 clove of garlic). Besides having a hard time getting the nutrients for the plants using the aquaponics method, the water would immediately turn dark green from the sun. I could have reduced this by using a black or non-translucent container for the tank, but I wanted to be able to see the fish occasionally. I didn't like the green water because eventually it was so green you couldn't see the fish anyway! It was finally time for version 2.0 of my condo lanai vegetable garden.
www.RickNakama.com hydroponicsI had purchased these things back in March, but haven't had a chance to set it up. It actually only took about 10 minutes to set up, but cleaning up the old system is what was a big job. I put the guppies and the cichlid in my indoor aquarium for now and I'll see how that goes.

These are the parts I used for this super simple set-up. Total cost approx. $50.
-bucket (white)
-cheap plastic planter (green)
-cheapest garden fountain water pump I could find ($19)
-silicone hose to fit pump outlet & length from bottom of bucket to top of planter
-expanded clay pellets (grow medium)
-outlet timer (capable of 30 minute cycles)
-Water Soluble Miracle-Gro 8oz trial size "All Purpose Plant Food" (24-8-16)

The cost to set-up might seem higher than buying a bag of potting soil, but I have a good feeling that in the long run it will be more effecient. I have started my version 2.0 system with the small bucket and planter just as a trial basis. If It works out, all I would need to do is spend money on a larger bucket and planter that can have more growing surface. I might also need a little more silicone hose and connectors to spread the water evenly and more expanded clay pellets which I already have a big bag of. The location of my plants are on my balcony facing afternoon sun so I don't feel the need for any grow lights right now.

Assembly:
-Place water pump into bucket.
-Pass silicone hose through bottom of planter drain hole (should have several holes; if it's not big enough or there aren't any you'll need to make some).
-Planter should be able to rest on the rim of the bucket or you will need a spacer under the planter to hold it to the desired height.
-Fill bucket with enough water to submerse the pump and be at about the level of the bottom of the planter.
-Hold end (opposite end of the side at the pump) of silicone hose up to center & top of planter.
-Fill planter with expanded clay pellets or whatever medium you choose leaving room for plants and more medium at surface.
-Plants' roots should be washed free of soil and gently placed in the medium while adding more medium to support the plants.
-Set timer to turn on for 30 minutes and off for 30 minutes all day long (this can be adjusted to maintain proper moisture for your area and plants).
-Plug pump into timer and check to see that it cycles off and on.
-While pump is running, make sure pressure is low enough so it doesn't shoot the water out of your planter & also check that water is being evenly distributed around the planter. I used cut up pieces of a drinking water bottle to direct flow of water outward.
-Dilute Miracle-Gro (instructions 1 Tblspn./Gallon of water is for normal use). Since I'm just starting this version now, I am starting with about 1/4 teaspoon/Gallon of water. **note: a gallon of water doesn't fit in my bucket. The bucket is only filled to about 4 inches from the bottom. Save the solution or make less if you don't need a gallon.

I sprinkled some new lettuce mix seeds, spinach seeds and mizuna seeds on the top so I placed a paper towel on the top to keep it moist so the seeds can germinate. We'll see how this version works. Hopefully better than my aquaponics.
日本語by Google Translate.
Related Posts Widget for Blogs by LinkWithin
© 2007 RickNakama.com
Use of this site indicates your agreement to our Terms of Service.